So I started looking for some good ideas for a cheesecake to try. I wanted to do something different, something I had never done before. While browsing around on Pinterest, I saw this picture of a Red Velvet Cheesecake. I knew I had to try it!!
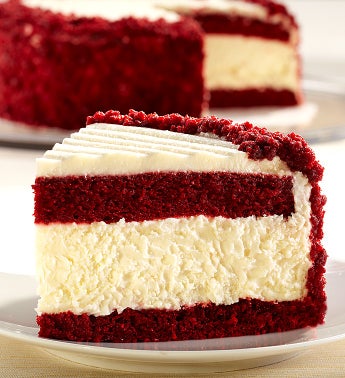 |
| Picture from 1-800-Baskets.com |
Now, I've made all the components before, but never thought of combining them. Luscious creamy cheesecake, with decadent moist red velvet, plus tangy sweet and smooth cream cheese frosting. YUMMY!
While, I think I could have done better with the Red Velvet part, I LOVE the recipes I use for cheesecake and cream cheese frosting. I'm going to have to experiment and make some more red velvet cake to see what I like the best. I think the best red velvet that I liked was from a local bakery. It was a really heavy, dense cake, almost like cutting through a piece of fudge, than cake, and the flavor was AMAZING! Plus it was so moist, it didn't crumb up much. Sadly that won't work for this cheesecake.
PUBLIC SERVICE ANNOUNCEMENT: I didn't really remember to take pics, so if you're looking for a step by step tutorial, please let me know. I know a few people who would be MORE than happy for me to make another cheesecake :)
So to break it down, we have a few basic parts that need to be made
- The cheesecake
- The red velvet cake
- The red velvet cake crumbs
- The cream cheese frosting
I've had much success with my cheesecakes before. Everyone who's tried them has loved them (talk about an ego boost). What I love about them is they are nice and dense, without a lot of cheesy flavor, and not too sweet, while not being a heavy cake, like when they are made with flour.
The Cheesecake
So for the cheesecake... I was a little nervous because I've never made a crust-less cheesecake before. I actually normally make a double thick crust and pre-bake it before filling it with the batter and baking again. So I held my breath, made the batter, poured it into my spring form pan, and waited impatiently for it to finish baking, and cooling, and chilling.
The Red Velvet Cake
For the red velvet cake layer I used the Joy of Cooking cake recipe since it is, at least in my mind, one of the tried-and-true, stand the test of time recipes. It's good, just not what I was looking for. I really wouldn't suggest a box mix for this part, since they tend to turn out light and fluffy, and probably wouldn't support the weight of the cheesecake. You also want to make sure your flavor of cake is going to contrast the flavor of the cheesecake, while at the same time complimenting it. So if you make a Vanilla cheesecake, you're probably going to want a stronger flavor cake, like Red Velvet, or Black Forest. Also consider the type of cheesecake you're making. If it's a really moist cheesecake, then you'll probably want to go for a dryer cake, and vice-verse if the cheesecake is a drier, flour type cake.

I decided on the thickness I wanted for the red velvet layers, and carefully cut my cakes to size. A good trick for this, is once you decide where you need to cut, find something you can use to measure that height repeatedly, and poke toothpicks into the cake at the height all around the cake, about two inches apart. This way, when you go to cut the cake, you have a guide to follow to help you get a nice even layer. I think it's better than buying one of those flimsy cake leveler things anyway. I go all the way around the cake, keeping the knife if the same spot and turning the cake so that I score a line all the way around, this way I know it's going to match up BEFORE I start slicing my cake apart. I also use a LONG bread knife, so that way it goes most of the way through. Less work.
The Crumb Coating
In order to make the crumb coating, I needed enough cake to have the inside layers, and enough left to crumble up. I ended up using two cakes, the same diameter as my spring form cheesecake. Since I made the red velvet cakes first, and they were cool by time the cheesecake was in the oven, I was able to sit and crumble the left over cake by hand. I found that I had to cut off the top edge of the cake, because it was a bit too dry to crumble nicely, and shave off the top layer across the dome of the cake because it somehow was too moist.
Let the crumbling commence! I just sat and crumbled by hand, while listening to some fun music since I wanted my crumbs to be a little less than uniform. If you have little ones, I'm sure they'd love to help. If you want a REALLY fine crumb, then get a mesh strainer, like what you would strain stock through to help catch all the little bits of herbs and stuff so you have clear broth. Rub the cake over this and it will break up into a really fine, uniform crumb. Set the crumbs aside, yes you will probably have a lot, that's a good thing!
The Cream Cheese Frosting
I used the Joy of Cooking cream cheese frosting because it's simple, and I know I like it. Well, I know it's a good base. I normally add some buttermilk to help make it not so overpoweringly sweet. I though about adding coconut flakes, but decided against it since they would add one more layer of texture to an already varied cake. I made a double batch, since I knew I would have plenty of cake crumbs left over.
Assemble the Cake!
This ended up not being as scary as it sounds. The trick I found, was to make sure the cheesecake, and red velvet were nice and cold before handling them. If you have time, leave them in the fridge for a few hours. If not, then pop them in the freezer for about 30 minutes (Assuming both are already cooled to room temp!) or until they are cold enough to handle.
Un-mold the cheesecake from the spring form pan, and use a long frosting spatula to separate the cake from the bottom of the pan. On your serving plate, or cardboard cake round, place the piece you decided to use as the bottom cake layer, cut side up. With the cheesecake loosened, but still on the bottom of the spring form, position the cheesecake near the cake layer, Flip the cake layer over so the cut side is on the top of the cheesecake, then place the serving plate over the cake layer.
Carefully, holding all three pieces, flip everything right side up together so the cheesecake is on top of the cake layer, with the bottom of the spring form pan on the top. Now you should be able to carefully pull the pan off the cheesecake. If it sticks, get your long spatula hot with tap water, and carefully slide it between the cheesecake and the pan. If the cheesecake is cold enough the pan bottom should slip right off. If it's too cold (like if you forgot about it in the freezer because one or more of life's little distractions got involved) then just wait a while for it to warm up, or carefully put HOT clean wash cloths on the pan bottom to help it unstick.
Now simply lay the last cake layer on top, and trim and edges that stick out. I had to trim the cheesecake very slightly all the way around.

Frosting and Crumb Coating
I made sure the frosting was at room temp before starting.
Put a crumb coat on the cake, and put it in the fridge for at least 30 minutes to set up. If you don't know how to crumb coat, then check out this information from Wilton for a little more info.
Since I wanted part of the top to be clean and crumb free when all done, I cut a circle of parchment paper, positioned it on the top of the cake, and pressed it in gently. This kept the crumbs off the top of the cake so I could pipe icing on later. I left about a 1/2 inch ring exposed so the crumbs would cover the top just a smidge. Once the parchment was in place, I put a final layer of icing around the cake, making it as even as possible, but I didn't pay much attention to how smooth it was.
This part is MESSY!!!
Get some more parchment paper, or some newspaper to cover the table, scoop up a handful of your crumbs and press them into the side of the cake. Let whatever doesn't stick drop down, then press in another handful. Scoop up the stuff that fell, and keep going, adding in more crumbs as you go. Make sure to get the top of the cake if you're crumbing that too.
When you're all done, set aside the remaining crumbs. They make great cake pops later.
Once you have all the stray crumbs brushed off the parchment on top, carefully and slowly peel the parchment off, and pip on frosting as desired.
If piping cream cheese frosting, remember it warms up and goes all floppy much much faster than butter cream, so keep your frosting in the fridge, and only put a little bit in your pastry bag at a time.


So, what do you think? I think I did pretty well for my first time trying this without anything to follow other than a picture. I think next time, I might make a chocolate cake, so it turns out more like an Oreo.
Like I said earlier, let me know if you want a more detailed step-by-step tutorial.
No comments:
Post a Comment
Comments make me happier than watching red pandas playing in the snow!
Questions, Constructive Suggestions and Warm Fuzzies are ALWAYS welcome!