Tuesday, June 11, 2013

Gardening, Family, Life, and Feeding the birds

OK, so this post has been in the works for over two months now, so it'll be a long one. Some info and pictures are at least two months old, but still worth adding.

In one of my earlier posts "Reflections, A New Year, and New Experiments, I mentioned something about goals I had for the year. One of those was growing and canning more of our own food. To that end, we have been working on getting some vegetable beds ready to grow yummy tomatoes, and corn, and squash, and green beans among many other things.

Since our lives are fairly busy right now, and we have friends who want to grow their own veggies too, we've been sharing the work. K and her daughter have been coming over and helping clear out rocks....lots and lots of rocks, and plant seedlings, all while teaching her adorable little lady bug about playing in the dirt, playing in the water from the hose, and splashing in the puddles made by the hose.

Dirty bottom, and playing in the hose water :)
One of the delays in working in the garden was the cracking, and spewing forth of water from our 75 gallon fish tank on April 26th. Probably about 45 minutes or so after my husband left for work, and after I had been asleep about 4 hours. Thinking back now, it was rather comical. To my sleeping brain, the first crack sounded like the linen cupboard door being closed, so I just rolled over and went back to sleep. Some time later, probably about 5 or 10 minutes, I heard another crack, groaned and rolled over wondering what on earth he was getting in the cupboard for again, then I heard the sound of liquid running and splashing....and it didn't stop. I yelled out "Please tell me that's you going to the bathroom?!" silence....well (random string of expletives).

So I get up and check the bathroom and nothing, head out to living room and as I'm walking down the hall I realize my cat is sitting on the arm of the couch staring raptly at the fish tank. As I walk past the tank I feel cold, wet, squishy carpet, and look down to see 5 streams of water coming out of the bottom back of the tank! Hence the comical running around trying to figure out what to do save the water, the fish and the floor, which at this point splashed when I stepped on it, since about 1/4 of the water was on the floor.
The crack going from bottom right to the top of the tank. Still have the pretty backing on.

I managed to grab one of those 5 gallon buckets and catch one stream of water that was wicking around and out the side, but I had to figure out a way to channel the water that was still pouring out the back, right towards the power outlets. First thing I saw...was a gallon ziplock bag....don't know why I thought that would work, but after standing there for about a minute trying to figure out how to get it to stay, I decided that was BS. I went to the kitchen and grabbed our small cutting board and managed to wedge that between the tank and the wall and redirect the water into the bucket, which was filling up really fast. So while that was filling I called the hubby to get him to come home. Then called K and the conversation went something like this...

K: Hi (cautiously because I normally don't call that early)
Me: Do you have towels (Duh...they wouldn't)
K: Yeah, I have a lot of towels. Why?
Me: My fish tank sprung a leak....
K: What!? Ok I'll grab my towels, and I have this little green that I can grab and suck water out of the floor
Me: That sounds great...

So our day that Friday revolved around sucking fish water out of the tank, and the floor. Well, at least the floor got a good scrubbing, courtesy of A bringing a brand spankin new carpet cleaner over, and the  fish tank got a thorough cleaning. We got a new tank, and actually got pretty lucky. We got a new 75 gallon tank, stand, lid and light for about $500.00 from a local pet store. Still a hefty chunk to have to drop like that, but we had to put the fish somewhere, and the tub wasn't an option!


New tank, still a little cloudy after transferring all the fish and decorations over. The guy below is our bottom feeder....aptly named Moby in the old tank. Yes, he takes up over half of the 23 inches of the tank from top to bottom. Probably closer to 20 when you count the pebbles on the bottom.


We've managed to chisel and scrounge out two beds. A small one between our driveway and a larger one at the back of our house. We realized that the one at the back of the house actually ends up in the shade by about 2:30 right now. Our neighbor's trees are hugely tall, and without the leaves, we didn't notice how far the shadows are thrown.  I'm confident that as we get further into summer, and the sun shifts, it'll be more in the sun.

So, we got both beds tilled, fertilized, and some peat moss turned in to the soil in an effort to break up the clay, and add some nutrients. The side bed is going to be home to some corn, and tomatoes, and green beans, and squash. The back bed pictured above is going to be home to lots of stuff, including zucchini, cucumbers, herbs, onions, cabbage, lettuce, spinach, spaghetti squash, and more that I can't think of at the moment.

Fast forward about a month, life continues to throw curve balls our way, including finding out we need to completely replace our AC unit (which if you notice is in the middle of the vegetable bed against the house.....yeah anyone else see tender young plants getting squashed by the workmen? Not intentionally of course!

Of course during all of this, I had a wish granted, and in the manner of wishes, not in a way I expected. Mid March I ended up taking over watching A's boys while she was at work. Not a week or so before I was thinking, "I'd really love to spend more time with A and her two kids". Yea...be careful what you wish for!

One week, we went to a local park and fed the birds! Both the boys and I ended up with little birds on our hands pecking seeds up! It was one of those rare, magical moments that just resonates with a hidden place in your soul. 


For as much as those kids push, and try to get what they want (what kid doesn't?) I love them. There were definitely the 'Aww' moments, sporadic at first, but with increasing frequency towards the end. Last Monday, the youngest practically marched up to me and said "We (his brother and himself) should do the chores so you guys can rest". Mom's voice popped into my head "Don't look a gift horse in the mouth" (What does that really mean any way??) so I jumped on the chance. They came up with a list of chores they could do. This listed included:

Run the vacuum
Clean the cat liter box
Clean off table after dinner
Take out trash/recyclables
Help with laundry
Water the plants
Pick up and organize the shoes by the front door
Help with dishes
Set the table
sweep the kitchen
pick up trash
pick  up toys
read a book
pick up and put back pillows and blankets on couch

Well I added the read the book one ;). What we did was make a chore cup, printed out the chores and cut them up. Then the boys would each pull a chore out of the cup, do it, and race to see who got done first, then pull the next one out until they were all done! I also made little lucky stars for them to transfer, along with the completed chore to the completed cup. The rule was that if they did all their chores, all week, and without complaining, they would be allowed to play video games on the weekend. We did this all week and it worked wonderfully. A is continuing this even though I'm not watching them anymore. 

Sorry this took so long to get up, but here it is in all it's un-edited glory! I'll be working on another post shortly about the garden, and how it's progressing.

Dreams are one of the driving factors of life. Dreams of the future, unfulfilled dreams, even nightmares, all drive us in one direction or another. It's up to us to choose which dreams to chase, and which need to be left behind. 

Monday, May 20, 2013

Experience Life Firsthand

I'm here today to 'beat a dead horse'. Many other blogs, articles, news casts etc have covered this same topic many times, which much more research, but I read something today that just tipped me over boiling. I started to type out a status on Facebook, and realized it was going to be just too long, so I moved over here.

WARNING: Expletives NOT deleted (for those sensitive enough to be offended), and opinions that could be offensive to some are expressed.


Vent/Rant:
I almost got sucked into a debate about which is better, paying for cable or internet+Hulu/Netflix. Both sides were vicious. How about instead of spending hours watching TV every day, and arguing over the most convenient/cheapest way, we boot our asses off the couch, go learn something new, make something, better our lives, and our children's in the process? In general...use our bodies and brains in the manner they were intended to be used.

How long has mankind lived without TV? Thousands of years. How long has man kind lived fully? Thousands of years. How long has TV (broadcasts) been around? Less than 100 years. I think it wasn't until the 50's that TV became commercialized. Now, how many of you hear yourself saying "I can't live without TV"? I ask you, why not? Because you need to know what happens next? Make it up for yourself, I promise you'll love the ending a hell of a lot better. Because you would be bored without it? Fuck that! You know all those things you say you want to do but never have time to? Well no TV means you'll have a lot more time to do things you want to do. Because you want to live vicariously through the TV because they have what you can't? Quit whining, quit being selfish, and go grab life and mold it to what you want it to be instead of wishing it were better. Because you don't think you can come up with stuff to do? Well here's a few ideas to get you started. Talk a walk in the woods, check out a local farmers market, play tag with the kids, plant a garden, read a book, make up a story in a round robin style, learn a new hobby, pick up a hobby you set aside, solve a puzzle, invite people over for dinner and TALK, feed the birds, go fishing, go explore your town, try a new recipe, volunteer somewhere, take up yoga, make home improvements, go to the library, the list can go on and on.

Now, I know that it's easier to plop kids down in front of the TV, or video games, and let them do their thing, especially when you just really need to get something done, and I think that's ok in moderation, but as someone who has little ones in her life, and loves them, how can you stand that blank, glassy eyed expression when they tune in and zone out? All of us, but kids especially, have absorbent minds. Some how, even if we can't recall everything, the things we see sink in to those minds. What do you want sinking in the little ones in your life minds, into your mind? Yes, there's some damn good programming out there for learning, for all ages. However I firmly believe that the best learning is done when experienced first hand. Yes, use TV, the internet, and smart phones to enhance your life. I use mine frequently to look up how to do something, or I'll stumble across an article that shows me something I'd never thought of before, or to help me figure out what something I've never experienced before is. Then walk away from them and go learn for yourself.

I think one of the big things about opting to watch someone else do things on TV, instead of opting to do it yourself, is that it removes the fear of failure, or the feelings of insecurity when we don't measure up to some of those awful societal standards of perfection. Can't really fail or be bad at anything if you just watch from the sidelines. But how will you know if you'll be good at it? You won't. Point blank, plain and simple, end of discussion. Unless you try. Unless you try many times, and fail. Then LEARN from your failures, grow from your experiences. YOU experienced them, and no one else can take that experience away.

Instead of living our lives through a box that flashes and makes all manner of sounds (yes I realize the irony as I'm currently in front of a computer), how about we actually get OUT there and live our lives? Yes, I love watching sci-fi, yes I like playing video games, and there are times when all I want to do is veg out, but damn it all I'm not plugged in to the things. Meet up with friends, play with the kids in your life (four legged and hairy included), and spend time EXPERIENCING life for yourself. Experience a scene of nature so beautiful and perfect you actually tear up. Experience what it's like to have a wild bird land on your hand. Experience new sounds, smells, and tastes at an ethnic restaurant. Experience the pride in completing something you've never done before. Experience the frustration when something doesn't work, and revel in it, because you are living.

Instead of asking, "What should I watch?", ask instead "How should I experience life today?" Let life inspire you. Who knows, you just might inspire someone else.

Tuesday, March 12, 2013

Cheesecake! Oh and Red Velvet Cake...Together

So, we had company for dinner last Saturday night. We have also been looking for an 'excuse' to try to make some French style food. One of the people that came for dinner LOVES cheesecake. I love to bake cheesecake (ok I love to eat it too, but really trying to watch what I eat). Match made in heaven!

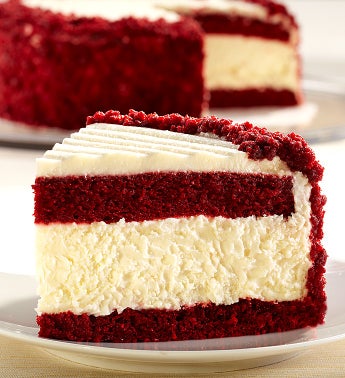
So I started looking for some good ideas for a cheesecake to try. I wanted to do something different, something I had never done before. While browsing around on Pinterest, I saw this picture of a Red Velvet Cheesecake. I knew I had to try it!!

Picture from 1-800-Baskets.com

Now, I've made all the components before, but never thought of combining them. Luscious creamy cheesecake, with decadent moist red velvet, plus tangy sweet and smooth cream cheese frosting. YUMMY!

While, I think I could have done better with the Red Velvet part, I LOVE the recipes I use for cheesecake and cream cheese frosting. I'm going to have to experiment and make some more red velvet cake to see what I like the best. I think the best red velvet that I liked was from a local bakery. It was a really heavy, dense cake, almost like cutting through a piece of fudge, than cake, and the flavor was AMAZING! Plus it was so moist, it didn't crumb up much. Sadly that won't work for this cheesecake.

PUBLIC SERVICE ANNOUNCEMENT: I didn't really remember to take pics, so if you're looking for a step by step tutorial, please let me know. I know a few people who would be MORE than happy for me to make another cheesecake :)

So to break it down, we have a few basic parts that need to be made

  1. The cheesecake
  2. The red velvet cake
  3. The red velvet cake crumbs
  4. The cream cheese frosting
I've had much success with my cheesecakes before. Everyone who's tried them has loved them (talk about an ego boost). What I love about them is they are nice and dense, without a lot of cheesy flavor, and not too sweet, while not being a heavy cake, like when they are made with flour.

The Cheesecake

So for the cheesecake... I was a little nervous because I've never made a crust-less cheesecake before. I actually normally make a double thick crust and pre-bake it before filling it with the batter and baking again. So I held my breath, made the batter, poured it into my spring form pan, and waited impatiently for it to finish baking, and cooling, and chilling. 

The Red Velvet Cake

For the red velvet cake layer I used the Joy of Cooking cake recipe since it is, at least in my mind, one of the tried-and-true, stand the test of time recipes. It's good, just not what I was looking for. I really wouldn't suggest a box mix for this part, since they tend to turn out light and fluffy, and probably wouldn't support the weight of the cheesecake. You also want to make sure your flavor of cake is going to contrast the flavor of the cheesecake, while at the same time complimenting it. So if you make a Vanilla cheesecake, you're probably going to want a stronger flavor cake, like Red Velvet, or Black Forest. Also consider the type of cheesecake you're making. If it's a really moist cheesecake, then you'll probably want to go for a dryer cake, and vice-verse if the cheesecake is a drier, flour type cake. 


I decided on the thickness I wanted for the red velvet layers, and carefully cut my cakes to size. A good trick for this, is once you decide where you need to cut, find something you can use to measure that height repeatedly, and poke toothpicks into the cake at the height all around the cake, about two inches apart. This way, when you go to cut the cake, you have a guide to follow to help you get a nice even layer. I think it's better than buying one of those flimsy cake leveler things anyway. I go all the way around the cake, keeping the knife if the same spot and turning the cake so that I score a line all the way around, this way I know it's going to match up BEFORE I start slicing my cake apart. I also use a LONG bread knife, so that way it goes most of the way through. Less work. 

The Crumb Coating

In order to make the crumb coating, I needed enough cake to have the inside layers, and enough left to crumble up. I ended up using two cakes, the same diameter as my spring form cheesecake. Since I made the red velvet cakes first, and they were cool by time the cheesecake was in the oven, I was able to sit and crumble the left over cake by hand. I found that I had to cut off the top edge of the cake, because it was a bit too dry to crumble nicely, and shave off the top layer across the dome of the cake because it somehow was too moist. 

Let the crumbling commence! I just sat and crumbled by hand, while listening to some fun music since I wanted my crumbs to be a little less than uniform. If you have little ones, I'm sure they'd love to help. If you want a REALLY fine crumb, then get a mesh strainer, like what you would strain stock through to help catch all the little bits of herbs and stuff so you have clear broth. Rub the cake over this and it will break up into a really fine, uniform crumb. Set the crumbs aside, yes you will probably have a lot, that's a good thing!

The Cream Cheese Frosting

I used the Joy of Cooking cream cheese frosting because it's simple, and I know I like it. Well, I know it's a good base. I normally add some buttermilk to help make it not so overpoweringly sweet. I though about adding coconut flakes, but decided against it since they would add one more layer of texture to an already varied cake. I made a double batch, since I knew I would have plenty of cake crumbs left over.

Assemble the Cake!

This ended up not being as scary as it sounds. The trick I found, was to make sure the cheesecake, and red velvet were nice and cold before handling them. If you have time, leave them in the fridge for a few hours. If not, then pop them in the freezer for about 30 minutes (Assuming both are already cooled to room temp!) or until they are cold enough to handle. 

Un-mold the cheesecake from the spring form pan, and use a long frosting spatula to separate the cake from the bottom of the pan. On your serving plate, or cardboard cake round, place the piece you decided to use as the bottom cake layer, cut side up. With the cheesecake loosened, but still on the bottom of the spring form, position the cheesecake near the cake layer, Flip the cake layer over so the cut side is on the top of the cheesecake, then place the serving plate over the cake layer. 

Carefully, holding all three pieces, flip everything right side up together so the cheesecake is on top of the cake layer, with the bottom of the spring form pan on the top. Now you should be able to carefully pull the pan off the cheesecake. If it sticks, get your long spatula hot with tap water, and carefully slide it between the cheesecake and the pan. If the cheesecake is cold enough the pan bottom should slip right off. If it's too cold (like if you forgot about it in the freezer because one or more of life's little distractions got involved) then just wait a while for it to warm up, or carefully put HOT clean wash cloths on the pan bottom to help it unstick. 

Now simply lay the last cake layer on top, and trim and edges that stick out. I had to trim the cheesecake very slightly all the way around. 


Frosting and Crumb Coating

I made sure the frosting was at room temp before starting.

Put a crumb coat on the cake, and put it in the fridge for at least 30 minutes to set up. If you don't know how to crumb coat, then check out this information from Wilton for a little more info. 

Since I wanted part of the top to be clean and crumb free when all done, I cut a circle of parchment paper, positioned it on the top of the cake, and pressed it in gently. This kept the crumbs off the top of the cake so I could pipe icing on later. I left about a 1/2 inch ring exposed so the crumbs would cover the top just a smidge. Once the parchment was in place, I put a final layer of icing around the cake, making it as even as possible, but I didn't pay much attention to how smooth it was. 

This part is MESSY!!!

Get some more parchment paper, or some newspaper to cover the table, scoop up a handful of your crumbs and press them into the side of the cake. Let whatever doesn't stick drop down, then press in another handful. Scoop up the stuff that fell, and keep going, adding in more crumbs as you go. Make sure to get the top of the cake if you're crumbing that too. 

When you're all done, set aside the remaining crumbs. They make great cake pops later. 

Once you have all the stray crumbs brushed off the parchment on top, carefully and slowly peel the parchment off, and pip on frosting as desired. 

If piping cream cheese frosting, remember it warms up and goes all floppy much much faster than butter cream, so keep your frosting in the fridge, and only put a little bit in your pastry bag at a time. 


So, what do you think? I think I did pretty well for my first time trying this without anything to follow other than a picture. I think next time, I might make a chocolate cake, so it turns out more like an Oreo.

Like I said earlier, let me know if you want a more detailed step-by-step tutorial. 

Monday, March 4, 2013

Tea, Soup, and Catching up

Hi All!

For the new followers YAY! Thanks for joining this crazy ride :)

Anonymous - Your request for honeymoon pics has been heard and being worked on. I have to get the laptop they are saved on up and running so I can pull them off.

So it's been a busy time. I've been working on the spring cleaning that I mentioned in my last blog, and have been moving away from electronic cleaning up of clutter to the more demanding, (sorely needed) task of the physical cleaning.

With a break for Valentines Weekend (I can't believe it's been almost 4 weeks since I posted something! Yikes!) Which was memorable, for good and bad. We started off that Friday night with a dinner out at a local place (not a big chain like Olive Garden), tried some new drinks, tried some new food, got some new sparklies for my Pandora bracelet. Then for the second year in a row we went to All Fired Up! and painted some pottery! I chose a large plate, and Hubby made a second storage bowl for us.


These shots are from before they were glazed and fired. Sadly when my husband went to pick them up, the piece next to his had exploded and embedded chunks of pottery into his incredible piece of art! BOO!!! At least they were kind enough to give us a gift certificate to cover the cost of painting another of the same.

Mine made it through unscathed: My mental image of Yggdrasil (very simplified). 


We also got a really cool version of Monopoly since Hubby loves that game, and has many fond memories of playing with his father. It's a vintage version, in a real wooden box (not fake wood painting to look like wood) with the original colors and playing pieces. Unfortunately, neither of us felt very well that weekend, so playing got put off until last week.

Hubby also "adopted" two Red Pandas for me!! Best Valentines Gift. EVER.


We also made a trip to my favorite tea shop, and was able to introduce a friend to their delicious selection of teas! One of my favorite things to do, is to bake goodies to go with tea, and have friends over. Yes, I still love having tea parties, I never out grew that, my friends are just a wee bit different now. They actually CAN drink the tea :-) I find that the most enjoyable times spent catching up with old friends, are generally over a glass of a good drink.

Spring Cleaning

I figured the best place to start is the room we use most. Those that know us, know we LOVE to cook and bake. Of course it also helped that we were in the process of moving the washing machine and dryer out of the kitchen to be put in a newly created laundry room.

I can't find what I did with the old pictures of the kitchen, but with everything in the kitchen, you really couldn't fit more than one person in there very well unless they are REALLY skinny, like supermodel skinny. We love to cook, we love to eat...we are not those people!

Any way, since we had someone out to run new drain, water line, and gas line for the dryer I used that opportunity to really get to cleaning in the kitchen. I started off with my favorite cleaner, Murphy's Oil Soap. It pulls the grime from fingers, cooking, whatever, off quickly and easily. So, here's my list of what get's cleaned when Spring Cleaning in the kitchen comes around.


  • Wipe off cupboard doors and handles, inside and out
  • Remove all contents from cupboard, wipe off shelves
  • Wash all dishes removed from cupboards, wipe off containers and check contents, especially herbs and spices. Toss any that have lost what it means to be flavorful
  • Repeat  above three steps with drawers
  • EVERYTHING on the counter tops are cleaned, and moved so the counter itself gets scrubbed down
  • Scrub the stove, including the front of the oven, and inside. Soak the grates and scrub them clean. It's amazing how dirty they get. 
  • Remove all magnets, pictures, papers etc from the fridge, and scrub it down too. For this I like Windex, or rubbing alcohol. Don't forget the top (like I did and just realized it!)
  • Move the movables, like the stove and fridge, so you can clean under and behind them.
  • Scrub down the walls and base boards, paying special attention to messy areas like the stove, and by the trash can. 
  • Finally, time to scrub down the floor
  • When dry, put everything back!
The floor after moving the stove...YUCK!

This is where the stove was, and that counter was turned 90 degrees to make an L with the stove .
That left just enough room for the fridge door to open

The stove has now been moved to where the dryer was

See how shiny my floor got after scrubbing over it with  Murphy's Oil Soap?! It Sparkles!!

Then we pulled the washer out....Yes, that really is all the counter space we have.

Grimy Nasty stove front

Even more hideous behind the knobs

Again, Murphy's Oil Soap to the rescue! Amazing Difference!

Finally, all done, everything scrubbed. We will some day be putting a dishwasher in that empty spot, and expanding the countertop all the way to the wall!!!

So, now that I have this wonderfully opened up kitchen, and actually have to take more than half a step to get to anything, and it's all nice and clean....TIME TO COOK!!!

I'd been craving some stuffed cabbage, but didn't want to take the time to make all those little yummy rolls of goodness. So I made soup. It was a hit! 

What I did:
1 medium - large onion, diced
Celery - enough that when diced is equal to the same amount of onion ( I think I used 4 stalks)
Carrot - roughly half as much as you have of onion, so I used 2 large carrots
1 stick butter
1 lb ground beef
1 lb ground sausage (I used plain not spicy or sage)
One head cabbage, diced into bite sized pieces
1 packet Lipton soup (I used the lot of a noodle chicken noodle)
1 large can diced tomatoes
about a gallon of water (that's about 16 cups, or 128 oz)
Beef bouillon to make the water into broth (although next time I might just buy broth)
Salt, garlic, oregano, basil, and sugar (to counter the sour from the tomatoes) to taste

The onion, celery, and carrot mixture is called Mirepoix, and is the BEST start to any soup. 


I started off by sauteing the mirepoix with the stick of butter in my stock pot, until the onion were soft, but not translucent. While this was going, I browned and drained the beef and sausage, then added to the stock pot, along with water, and bouillon until I had a good flavor. Then I dumped in the cabbage, soup packet, and tomatoes, and let everything simmer for about an hour so the cabbage was tender. 

I wasn't too happy with the flavor at this point, so I added in a few generous pinches of coarse salt, as well as a generous sprinkle of granulated garlic. Let it simmer more, and it was getting there but not quite. 

So when tasting, I try to keep in mind that the flavors need to balance. If it's too salty, I need to a little sour or sweet. If it's too sour, I need to add a little bitter or sweet, if it's too sweet, then add sour or salty. See how that works? In this case, the tomatoes had made it a bit too sour for my tastes, so I sprinkled in a little sugar. That really helped mellow out the tomato, but it was still there. After added some oregano, and basil, (which adds a little bitter along with their own distinct flavors), and letting it simmer for a while, it was spot on! Served over some freshly cooked rice and YUM!

Remodeling

Now...those big appliances that got moved out of the kitchen....they got switched around to our hall closet, turned laundry room. We are still working on finishing up the walls in that area, but over the weekend, we were able to build a raised floor to set the machines on, and I LOVE how it looks! I was just a tad bit too busy helping hubby build the frame, and then attaching the boards to the frame to remember to stop and take pictures! 

Had to grab a shot before the washer went in.

Well, that's most of what's happened in the past month. Thanks for sticking with my during my long breaks! Hope to try experimenting with more cooking this week, and get a few more recipes up. Take care all!